Introduction: Slow Sand Filter for Water Purification
Access to clean drinking water remains a pressing concern globally. For decades, slow sand filters have been a dependable solution, offering a cost-effective and sustainable way to purify water. This expanded guide delves deeper into the details, covering construction, operation, and maintenance while integrating expert opinions, real-world applications, and updated insights to help you create and optimize a slow sand filter.
What is a Slow Sand Filter?
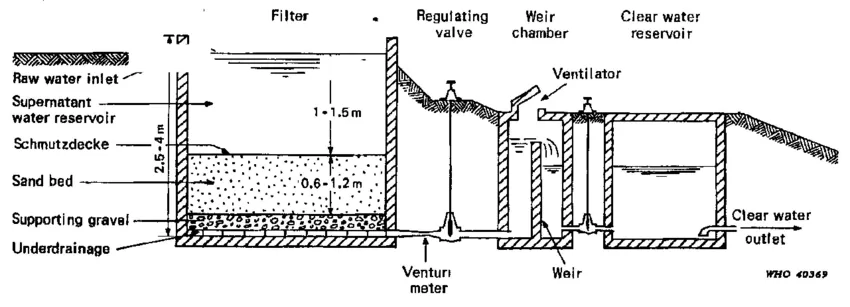
A slow sand filter is a water purification system that utilizes layers of sand and gravel to remove impurities from water. It operates primarily through biological filtration, where a biofilm layer—referred to as the schmutzdecke—forms on the sand’s surface. This layer contains microorganisms that digest organic materials, pathogens, and harmful bacteria, resulting in safe, clean water.
Unlike chemical treatment or rapid sand filters, slow sand filters are environmentally friendly and require minimal maintenance. They are widely used in rural areas, emergency response efforts, and small-scale communities where clean water is critical but resources are limited.
Advantages of Using a Slow Sand Filter
Slow sand filters are popular for several reasons:
- Eco-friendly Technology: No chemicals or electricity are required, making them ideal for off-grid areas.
- Cost-effective: Once built, they have low operational costs and a long lifespan, often exceeding 20 years.
- Effective Filtration: Capable of removing up to 99% of harmful bacteria, including E. coli, Cryptosporidium, and Giardia.
- Versatility: Suitable for various water sources, including rivers, lakes, and rainwater.
These filters also meet the needs of communities striving for sustainable water solutions and align with global goals for clean water access.
Materials Needed for Construction
To build a reliable slow sand filter, you’ll need:
- Container: A durable structure like a concrete tank, plastic barrel, or steel drum. For household filters, a container of 200–500 liters is sufficient.
- Fine Sand: Ensure the sand is washed, cleaned, and sieved to the appropriate particle size (0.15–0.35 mm).
- Gravel: Different grades of gravel are needed for layering.
- Pipework: Includes an inlet pipe, outlet pipe, and drainage pipe. PVC pipes are a cost-effective option.
- Mesh or Screen: To prevent the fine sand from escaping through the outlet.
- Water Source: A consistent supply of raw water to test the system during construction.
Ensure all materials are clean and free from contaminants before assembly.
Step-by-Step Guide to Constructing a Slow Sand Filter
1. Choose the Right Location
Select a location that is:
- Easily accessible for regular maintenance.
- Close to the water source.
- Protected from direct sunlight and contamination.
2. Prepare the Container
- Clean the container thoroughly to remove any debris or residues.
- Drill holes at appropriate locations for the inlet, outlet, and drainage pipes. Ensure these openings are watertight to prevent leakage.
- Install a mesh screen or cloth at the outlet to prevent sand from flowing out.
3. Create Gravel Layers
The gravel layers form the base of your filter and provide support for the sand. Add layers as follows:
- Bottom Layer: 10–15 cm of coarse gravel (20–30 mm in diameter).
- Middle Layer: 5–10 cm of medium-sized gravel (10–20 mm).
- Top Layer: 5 cm of fine gravel (2–5 mm).
Ensure the layers are even and compact.
4. Add the Sand Layer
- Wash the sand thoroughly to remove dust, silt, and organic debris. This step is crucial for maintaining filtration efficiency.
- Add a 60–80 cm thick layer of fine sand on top of the gravel. This will serve as the primary filtration medium.
5. Install the Pipework
- Connect the inlet pipe to the top of the container.
- Attach the outlet pipe near the base, ensuring it is properly screened to prevent sand loss.
- Install a drainage pipe for cleaning and backwashing.
6. Fill the Filter Gradually
- Slowly fill the container with clean water to avoid disturbing the sand and gravel layers.
- Let the system settle for 1–2 days before testing.
How Does the Slow Sand Filter Work?
The slow sand filter operates through a combination of physical, biological, and chemical processes:
- Physical Filtration: Suspended particles in the water are trapped as it flows through the sand.
- Biological Action: The schmutzdecke forms on the sand surface, breaking down organic impurities and neutralizing harmful bacteria.
- Chemical Processes: Natural oxidation and adsorption remove dissolved contaminants, such as heavy metals.
The result is clean, safe water that meets drinking water standards.
Maintenance Tips for Optimal Performance
A well-maintained slow sand filter can provide years of reliable service. Here’s how to keep it functioning efficiently:
- Monitor Flow Rates: Slow flow indicates clogging. Clean the schmutzdecke when necessary.
- Clean the Sand Surface: Gently scrape off the top layer of sand to remove accumulated debris.
- Flush the System: Use the drainage pipe to backwash the filter occasionally.
- Replace Sand Periodically: Over time, the sand may lose its effectiveness and should be replaced every 5–7 years.
Experts Insights on Slow Sand Filters
Experts advocate for the widespread adoption of slow sand filters due to their proven efficiency and simplicity.
Dr. Michael Lambert, a water treatment specialist, states:
“Slow sand filters are among the most sustainable water purification methods available today. Their ability to operate without electricity or chemicals makes them indispensable in low-resource settings.”
In addition, Ms. Neha Gupta, a public health engineer, highlights:
“With proper maintenance, these filters can remove up to 99% of waterborne diseases, offering a practical solution for rural communities.”
Timeline of Construction
Here’s a detailed timeline for constructing a slow sand filter:
- Day 1: Gather materials and prepare the site.
- Day 2: Assemble the container and install the pipework.
- Day 3: Add gravel and sand layers.
- Day 4: Fill the filter, test water flow, and monitor initial filtration.
- Day 5: Begin using the filter for water purification.
Applications of Slow Sand Filters
Slow sand filters are widely used in various contexts:
- Rural Communities: Providing access to clean water in remote areas of Africa, Asia, and South America.
- Emergency Relief: Quickly deployed during natural disasters to ensure safe drinking water.
- Urban Households: Compact designs for individual homes or apartments.
- Agriculture: Ensuring clean water for irrigation and livestock.
Conclusion
Building a slow sand filter is not only a cost-effective solution for water purification but also a step toward sustainable living. With proper construction and regular maintenance, these filters can provide clean water for years, benefiting individuals and communities alike.
Remember, the success of a slow sand filter lies in the details—clean materials, careful construction, and consistent upkeep. With this guide and the insights shared by experts, you’re well-equipped to construct a reliable system that meets your needs.
Let’s ensure clean water access for all—one slow sand filter at a time.
📚 Take Your Trading And Financial Skills to the Next Level!
If you enjoyed this post, dive deeper with our Profitable Trader Series—a step-by-step guide to mastering the stock market.
- Stock Market 101: Profits with Candlesticks
- Stock Market 201: Profits with Chart Patterns
- Stock Market 301: Advanced Trade Sheets
Start your journey now!
👉 Explore the Series Here
For Regular News and Updates Follow – Sentinel eGazette
FAQs:
1. What are the primary benefits of using a slow sand filter?
A slow sand filter provides effective water purification without the need for electricity or chemicals, removes bacteria and pathogens, and has a long lifespan if maintained properly.
2. Can a slow sand filter handle all types of water contaminants?
Slow sand filters are effective for removing biological contaminants like bacteria and protozoa but may not remove dissolved chemicals or heavy metals without additional treatment.
3. How often should the sand in a slow sand filter be replaced?
The sand typically needs replacement every 5–7 years, depending on the frequency of use and maintenance practices.
4. What materials are essential for constructing a slow sand filter?
You’ll need a durable container, clean fine sand, gravel layers of varying sizes, pipework (inlet, outlet, and drainage), and a mesh screen.
5. Is it possible to build a slow sand filter at home?
Yes, slow sand filters are simple to construct and can be built at home with basic materials and tools, making them accessible to households in rural or urban areas.